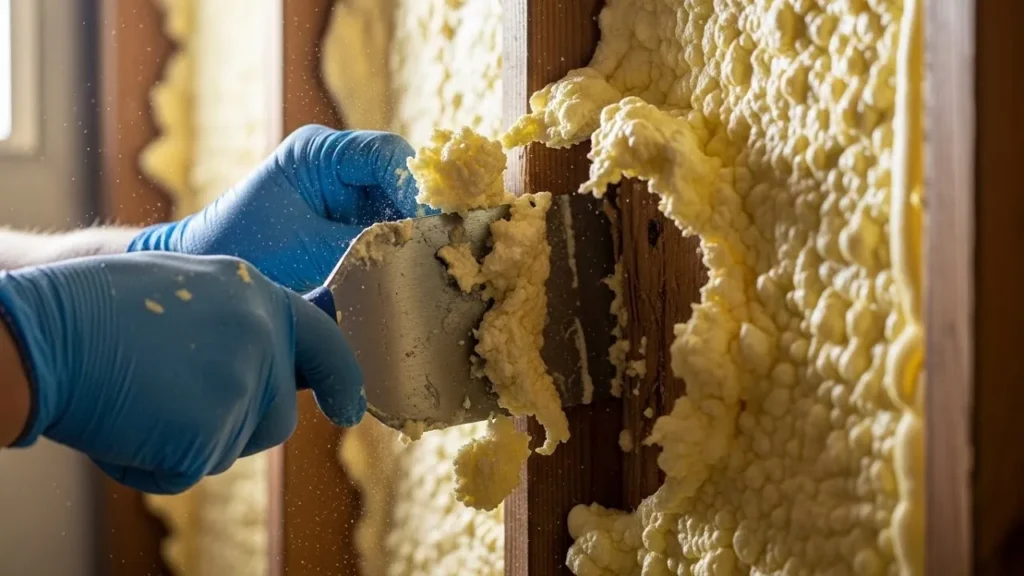
The first time I watched a homeowner attempt to remove spray foam insulation with ClearFoam Roof & Insulation, they thought it would feel like carpet underlay. Instead, the closed-cell spray foam clung to the timber with a grip shaped by old installation cycles, material-setting kinetics, and deep bonding inside the grain.
Within minutes, they were pulling out splinters from the rafters rather than insulation. That experience taught me something simple but important: DIY spray foam removal is possible, but only if you understand the behaviour of the foam, the substrate condition, and how the roof responds when disturbed.
What Should You Do If You Want to Remove Spray Foam Insulation Yourself for a Clean Result?
Before touching the insulation, you must understand the type of foam and how strongly it bonded.
Identify The Foam Type
Most roofs use closed-cell spray foam, which hardens into a dense structure shaped by gypsum crystallization behavior and long-term compression. When you cut it, you’re working against rigid expansion patterns that resist traditional tools.
Test A Small Area First
A controlled incision tells you how the foam behaves. If it fractures rigidly, the bond runs deep. If it slices smoothly, removal may be more manageable.
Look For Moisture-Related Indicators
Foam that shows staining or soft spots may reveal patchy absorption anomalies or weakened areas from long-term humidity. These zones demand lighter handling because they often mask fragile timber.
Remove The Foam in Controlled Layers
Peeling large sections stresses the rafters. Layering protects the timber and respects the foam’s cured structure, especially when expansion influenced substrate suction variation and timber bonding.
One homeowner facing Spray Foam Removal Bournemouth learned quickly that coastal humidity made their foam brittle in some areas and rubbery in others. Understanding this behavior prevents damage.
How Can You Remove Spray Foam Insulation Yourself Safely on Walls or Ceilings?
Removing foam overhead increases both difficulty and risk, especially when dealing with wiring or uneven plasterboard.
- Use Stable Access Equipment
A secure platform or scaffold gives you controlled movement. Foam removal requires leverage, and an unstable surface turns that leverage into a hazard. - Wear Proper Safety Gear
Cutting older foam releases particulates shaped by evaporation-phase inconsistencies and aged adhesive layers. A respirator and eye protection are essential for safe working conditions. - Locate Structural and Electrical Paths
Foam often embeds itself around wiring routes. Understanding drywall substrate interaction helps avoid cutting into hidden cables. - Work In Small Overhead Sections
Removing too much at once can cause plasterboard to flex and crack. A homeowner attempting Spray insulation removal Poole discovered their ceiling was unevenly fixed, and large pulls caused movement along the joints.
Which Issues Cause Problems When You Remove Spray Foam Insulation Yourself in Damp Rooms?
Damp rooms change how foam sets and ages, creating inconsistent behavior during removal.
Expect Inconsistent Density
Foam in damp areas undergoes humidity-driven curing behavior, leading to hard brittle zones and softer patches. Every cut will feel different.
Watch For Weakened Timber
Moisture trapped behind foam weakens the surface of rafters, causing localized shrinkage distortions and splintering when pulled against.
Check For Hidden Mould
Mould forms behind foam when ventilation is limited. Cutting into this exposes spores that require proper extraction and protective gear. If the foam shows inconsistent density or moisture damage, a professional inspection from ClearFoam Roof & Insulation may prevent unnecessary structural stress.
During an Insulation removal Bournemouth job, half the foam sliced away cleanly while the other half resisted every cut due to moisture locked behind it. This unpredictability is common in damp environments.
How to Check Spray Foam Before Removing It in Damp Rooms or Loft Spaces
Pre-removal evaluation is the difference between safe DIY work and damaging the roof.
- Assess Surface Porosity Levels
Porous zones signal deeper foam penetration. These require shallow cuts because the bond is tighter. - Look For Uneven Drying Signatures
Discolored foam suggests inconsistent moisture retention or long-term exposure that affects curing cycle progression, making some areas weaker than others. - Check Temperature Variations
Cold patches reflect thermal gradient effects, often making the foam stiffer and more resistant to cutting. Warmer patches detach more easily. - Pay Attention to Oduor During Cutting
Sharp chemical smells may indicate deteriorating foam. This requires slower removal to avoid breaking off brittle pieces unpredictably.
During an Insulation removal Poole project, the loft showed intense temperature differences across rafters, producing unpredictable resistance during cutting. This is typical in older attics.
How to Check General Building Work Before Removing Foam
Foam removal influences the structure around it. Understanding this prevents secondary damage.
Press Gently Along the Rafters
Softness indicates compromised timber. Foam often hides these weaknesses until removal starts.
Check Plasterboard Stability
If ceiling boards flex easily, pulling foam may cause cracking due to shifting pressure points and older fixings.
Look For Microcracking Formation
Small cracks near joints signal structural movement. DIY removal increases stress in these areas, so slow, controlled cutting is essential.
Understanding the building’s behavior helps prevent escalating damage during foam removal.
Is It Normal for Surfaces to Look Rough Before Painting or After Foam Removal?
Some roughness is expected after removing foam, especially older or rigid materials.
Expect Exposed Grain and Indentations
Foam bonds strongly, so removing it often exposes raw timber patterns. These can be sanded and refinished.
Unusual Signs Require Attention
Rapid moisture return, timber splitting, or deep cracking are not normal. These relate to foam affecting long-term moisture distribution patterns.
Painting should only begin after full drying and substrate stabilization. Rushing this stage creates visible defects.
Also Read: Can You Insure a House with Spray Foam Insulation
What Leads to Major Problems When Removing Spray Foam Insulation Yourself in Older Houses?
Older homes carry layers of materials and repairs that change how foam interacts with the structure.
Mixed Substrates Create Unpredictable Removal
Older materials respond differently to cutting because of varying surface compression timing and inconsistent adhesion failure indicators.
Wiring May Be Embedded in Unusual Places
Foam expands around outdated wiring, making accidental cuts possible if you don’t assess properly. When tackling Closed cell spray foam Removal Bournemouth, a homeowner discovered that each rafter behaved differently because their roof had been repaired several times across 40 years.
Temperature Inconsistencies Cause Removal Difficulty
Older roofs show intense ambient temperature influence, making some areas brittle and others flexible. This variation affects your technique.
FAQs About Removing Spray Foam Insulation Yourself
1. Can I Safely Remove Spray Foam Insulation Myself?
You can remove small areas of newer foam, but full roof extraction is rarely safe for DIY because older closed-cell foam bonds deeply into timber and resists standard cutting tools.
2. What Tools Do I Need for DIY Spray Foam Removal?
A saw, insulation knife, pry tools, and protective gear are essential. Larger projects require specialist tools that most homeowners do not own.
3. How Long Does Spray Foam Removal Take?
A small loft section may take hours, while full removal can take days. Foam age, density, and moisture exposure influence the pace significantly.
4. What If I Damage the Rafters During Removal?
Minor splinters can be repaired, but deep gouges require reinforcement. Damage of this kind affects roof stability and long-term performance.
5. Why Is Closed-Cell Foam Harder to Remove?
Closed-cell foam expands into timber pores during installation. Once cured, it forms a rigid shell that resists most DIY removal methods.
6. Can I Paint After Removing Spray Foam?
Not immediately. The roof must dry fully and stabilize. Painting too early traps moisture and leads to staining or peeling.
7. When Should I Call a Professional?
If the foam is old, bonded deeply, surrounding wiring, or covering weakened timber, professional removal prevents structural damage.